Eric Clapton; There’s One In Every Crowd Tour, on 15 August, 1975 by Matt Gibbons, licensed under (CC BY-SA 2.0)
Let’s look at the exciting world of the minor pentatonic guitar scale. Electric guitarists and acoustic guitarists will benefit from learning the minor pentatonic scale – it’s so incredibly useful.
Want to jam the blues like Eric Clapton, mesmerise audiences like David Gilmour, or play stunning yet simple licks like B.B. King?
If so, this is the scale.
Today, we’re learning this scale in a super useful way which…
You’ve probably NEVER been shown before!
First, did you know there are 5 common shapes for playing the minor pentatonic scale?
Well, for 99% of guitarists, learning all these five shapes is a waste of time.
Unless you are an advanced guitarist and can play lead guitar seamlessly and in your sleep, I wouldn’t bother!
Yes, it’s controversial, I know.
I’ve seen this many times in the past when teaching in my studio.
A guitarist walks into a studio…
Many years ago, Adam walked into my studio.
He could barely play a C chord smoothly, he had slow chord changes, and he thought that a “guitar lick” is when you taste your six-string like an ice cream (I’m joking on the last point).
…But Adam was clearly a beginner who had somehow been taught ALL 5 common shapes for the minor pentatonic scale.
Oh dear.
I told him this very important point:
“It’s not how many scale shapes you know.
It is what you do with the scale that counts!”
You see, learning five scale shapes can be overkill if you can’t play a few licks that sound great.
B.B. King was a master of this.
You can play one lick and vary it in many ways to play something very cool.
You just don’t need loads of scales!
So, in this post, we’re simplifying things so you can master the fundamentals of playing melodies and lead on your guitar.
The Minor Pentatonic Scale – A Unique 4-Step Process For Mastering It
Today, we’re learning just two simple scale shapes for the pentatonic minor scale…
…But we will do so in a nifty little way, which you’ve probably never been taught before.
These two shapes are VERY important and serve slightly different roles.
- Shape 1 is your lower octave scale
- Shape 2 is your higher octave scale.
Playing both shapes allows you to cover a larger range of notes when playing solos, giving you the best of both worlds.
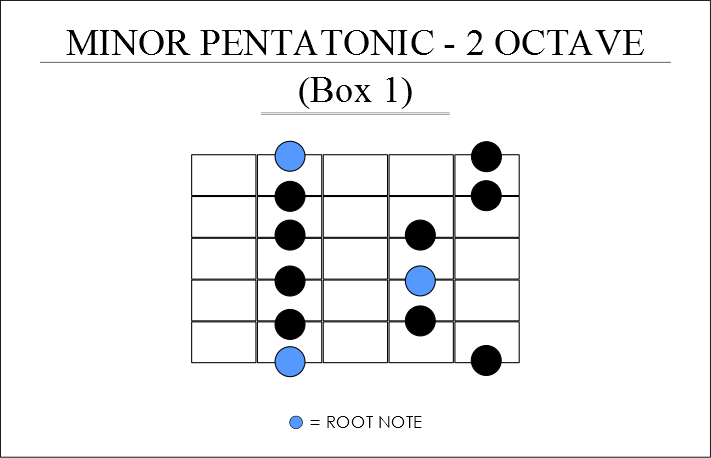
Step #1 – Pentatonic Minor Shape Box 1
The first shape we will learn is the standard minor pentatonic shape.
This is the shape that most people learn when starting out with this scale.
Go ahead and play the scale.
Begin so that the first blue dot (in the bottom left corner) is on the 5th fret of the low E string…
A Quick Word on How to Read Scale Charts
If you’re unsure what the above image means, here is an explanation…
- Horizontal lines – these are the strings. The top line is the high E string (1st string 1). The bottom line is the low E string (6th string).
- Vertical lines – these are the frets.
- Blues dots – these are the ‘root notes’ (most important notes)
- Black dots – these are the other notes in the scale
The root notes are very important in music and especially in scales.
The root note is the note the scale is named after. For example, if we were to play the scale so the blue in the bottom left corner is on the low E string 6 at fret 5…
That note would be A.
Therefore, the scale would be called the A Minor Pentatonic Scale.
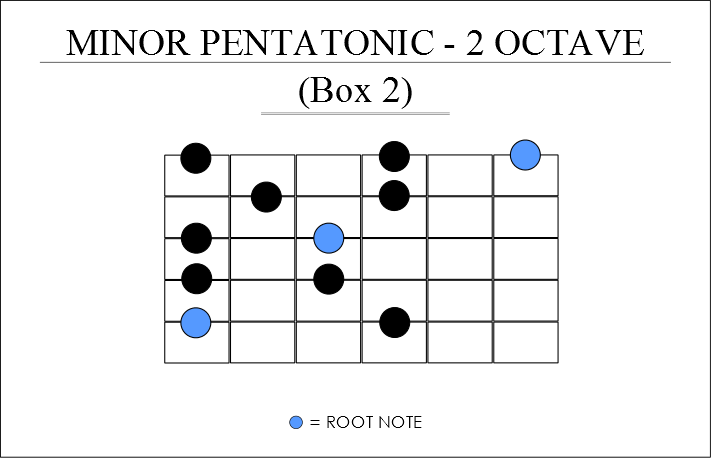
Step #2 – Pentatonic Minor Shape Box 2
Next, once you are comfortable with the above typical scale…
Learn this next slightly more unorthodox (but still very useful) shape.
This will allow you to play piercing, powerful high notes and add massive range to your playing.
Play this shape so that the lowest root (blue) note is on the 12th fret, 5th string.
When you play the above scale shape, you will still be playing the A Minor Pentatonic Scale…
…But at a higher octave – cool, huh?
This means you can use shape 1 for the lower notes in a guitar solo and shape 2 for the super melodic higher notes!
Combined, this gives you a great balance of grizzly low and sweet high notes!
Geek Bit!
In technical terms, both shapes use two octaves. The lower octave in shape one (which is from the lowest blue note up to the second blue note) is unique to shape one.
The 2nd octave from shape one (from the second to third blue notes) is the same set of notes as in the lowest octave of shape two.
The higher octave of shape two is unique to shape two.
This will make more sense the more you practise the scales, but this basically means that we have two shapes which contain:
- One low octave (used in shape 1)
- One middle octave (used in both shapes)
- One high octave (used in shape 2)
Step #3 – Pentatonic Scale Guitar and Combining Both Boxes
Now then, let’s put them together to “unlock” the fretboard.
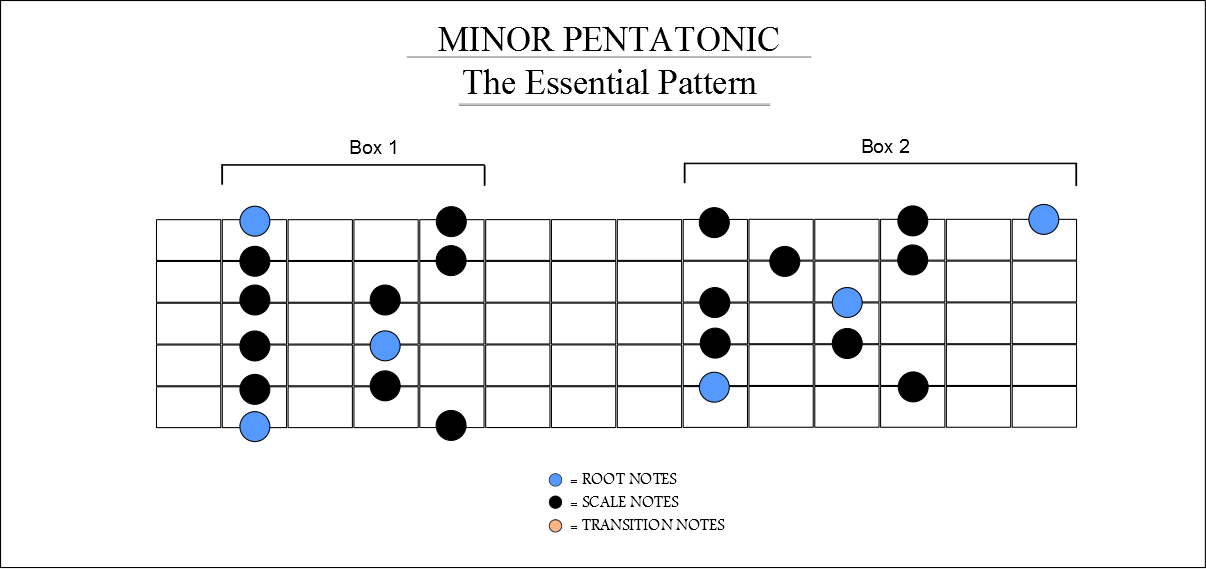
Below, we have the two shapes combined to give us what I call “The Essential Pattern”.
The Essential Pattern is what I drill (in a nice way, of course) into all my students looking to get good at lead playing.
You can see the two box shapes that we have learnt above and see how they are combined on the fretboard.
As long as you play box shape #2 a full 7 frets higher than box shape #1, you will be in the same key.
That is one easy way to look at it.
Or if you know the notes on the fretboard well, and know the root notes in the scale shapes (as shown by the blues dots above), then you can easily find the key you are in.
Step #4 – The Minor Pentatonic Scale: The Essential Pattern
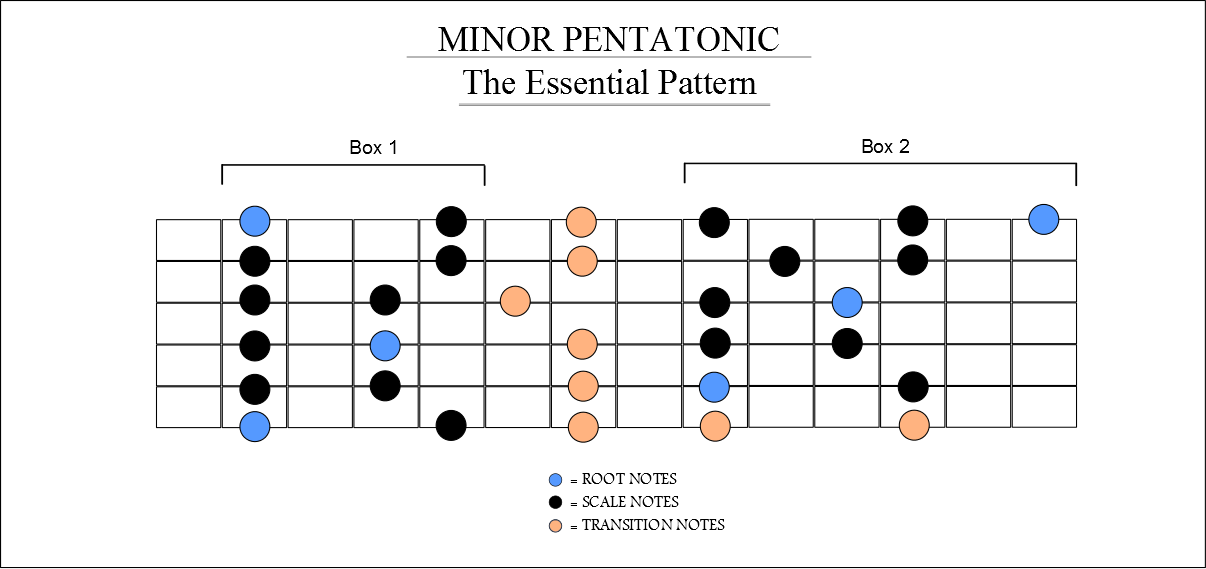
Once you have mastered both box shapes and can seamlessly switch between the two, then it’s time to learn the transitional notes as shown in orange below.
These are extra ‘Brucie bonus’ notes if you like, and should not be learned until you are comfortable with the other two shapes.
The transitional notes are great, as you can use them to slide or move between the two shapes without awkwardness.
Take your time learning ‘The Essential Pattern’.
Do not rush.
Don’t just play the scale up and down.
Learn lots of melodies and guitar solos that use this scale, improvise, be comfortable playing legato, vibrato, and string bending within the scale.
There are limitless amounts you can do with this shape.
How to Learn the Minor Pentatonic Scale on the Guitar
Below is how I recommend you learn the minor pentatonic scale on the guitar for maximum efficiency and minimum fuss.
- Step #1 – Learn box shape #1 – Get comfortable playing it in your sleep and learn where the 3 root notes are located.
- Step #2 – Learn box shape #2 – Again, get comfortable playing it in your sleep and learn where the 3 root notes are.
- Step #3 – Switch between the two shapes – Be able to improvise over a backing track, doing 4 bars on each shape. At the end of the 4 bars, jump to the next shape.
- Step #4 – Learn the transitional notes for more options – these notes are great to slide between, allowing for a seamless way to move from one shape to the next.
Next steps…
- The Fretboard – truly learn and understand where the notes are on the 6th and then 5th string.
- Play it in multiple keys – Combine your knowledge of the notes on the fretboard and where the root notes are in this pattern to be able to play “The Essential Pattern” in every key.
Pentatonic Scale Guitar: Why Not Learn All Five Pentatonic Shapes?
That’s a fair question.
The problem with learning more than two scale shapes for the minor pentatonic scale is that they don’t encompass any extra higher or lower notes, and thus are less useful.
Many of the notes are repeated at the exact same pitch, which means they’re not as useful!
If you have learnt all 5 common shapes in the past, don’t worry it’s not wasted time, keep on practising them, but my advice is to prioritise this pattern for maximum benefit.
For everyone else, start off by learning this pattern.
Once you get this pattern down, you can expand upon it some more.
Make sure you can play the essential pattern in your sleep, you can improvise and jam with it in multiple keys, and then consider learning the other box shapes – but only do so if or when you ever feel like this pattern isn’t enough.
Believe me, though, you can play some mesmerising guitar with the above pattern alone!
Download a free wall chart of ‘The Essential Pattern‘, print it out, and stick it up next to your guitar to help you learn it inside out.
I hope you enjoyed this. If you want more help from me, check out this post on how to play guitar where I share 27 powerful tips most beginners are NEVER taught.
Right, thanks for reading, and please do leave a comment below and let us know what you think!


This is actually pretty brilliant. You’re “tricking” people into learning four of the shapes without actually realizing it. Well, five if you can visualize how to wrap it around again. But thinking of it as just two shapes with transition notes seems much easier. Very cool.
Thanks Leisha! Glad you have found it so useful. Yep, learning the two shapes and then the transitional notes is so much easier. It allows you to get on with the actual playing of the awesome parts that use the scale right away rather than spending lots of time trying to remember it!
What are some well known guitar solos that use this scale?
Hey Billy, there are hundreds. Most of the old school blues stuff by legends such as B.B. King and similar artists use this scale. A lot of classic rock players such as Angus Young, Tony Iommi used it a lot too. `Paranoid` is a great example.
Love they logic and the way this is laid out. Are there similar charts for major pentatonic and blues pentatonic? Is minor the main stay?
Thanks Ron. I tend to use the minor scale much more than the Major scale, but yes, you can definitely use the same principles for any scale. I`ll create a chart showing the Major pentatonic scale in a future post. Thanks for the comment!
Great article Danny! I’ve read a couple of other articles about the pentatonic, and they have all appeared to be all-over the place. Not very nice, no, but you’ve managed to explain it so that one could understand it. Not only that, now, learning it also appears to be doable after reading your text. Maybe because you cut away all the intermediate stuff and instead focused on the basics. Which is nice. Thanks!
Hi Linus, Thanks for the comment. I totally understand what you`re saying. When I started out I used to buy Total Guitar, a great magazine but it always assumed you knew the basics, was very frustrating. I always aim not to make the mistake those guys did and explain things properly so thanks for letting me know you found this useful.
Ok so I think this information is incredibly valuable – but I’m having a hard time putting this into practice – especially when we get into the transition notes.
Could someone link a video that shows some examples and breaks down how to use the shapes and transitions?
Thanks!
Hi from down under.
Great article- thanks. Would appreciate the Major scales.
John.
Hi John,
Cheers, I will get on it. 🙂
Hi Dan,
Thanks for this great post. I’ve been jamming with a print out of this pattern next to me for some time, it’s been a wonderful learning tool.
I too would love to see a similar post about a major scale.
All the best,
Michael
When do I learn it?. I am learning strumming soul and fingerpicking. ?
Hi Cherry, you can learn it when you are ready for it. It`s never too soon to give it a crack. You can then add it to your playing and go over it regularly to keep on top of it. 🙂
Danny , you nailed it for me .. ! ! ! ! …finally a concept that ignores all the overwhelming but helpful stuff online. You have “cut to the chase” and provided a logical concept to work towards – rather than information overload. To have the Kahunas to state that it is actually OK to use the 2 similar shapes of the 5 is commendable. I was struggling with learning all 5. I can now see the relationships more clearly and where the roots are. Thanks for the epiphany …
What Frets are your patterns on…
You can play them on any fret, John. As long as box 2 is 7 frets higher than box 1 as shown in the `Essential Pattern` diagrams they will be in the same key and will work fine.
Hi,
I’m the last person to cause trouble….but here we go!
Your boxes seem to be at odds with “other” boxes I’ve come across.
Box ! matches But “your” box 2 is “their” box 3. “Their” box 3 is as “your” box 2 and “their box 2 lies in between with the root on the second string.
……or is it me?
Thank you and cheers,
Chris Roper.
Hi Chris, no problem. You are right that many others use different numbers for the box system. In this example, I was referring to box 1 and box 2 in relation to the diagrams and not what others call them. Other people would have a box in between my box 1 and 2, which would make this box 2 and therefore what I called box 2, become box 3.
There are 5 box shapes to use overall but the two in my diagram are the most useful and practical in my experience.
Hi Dan, I have just started to learn the A minor pentatonic. And I like your approach very much. But I have one question: What fingers should I use when I play box 2? Especially at the end on the high e string, there are three notes to play.
Thank you very much.
Andreas
Hi Andreas, thanks, that`s great.
Ideally, you would play the notes on the high E string with the index, ring and pinkie. This could be a massive stretch so if you can`t do it, just move your hand as you travel up the neck.
As a bonus, you could also play these notes index, pinkie and pinkie again which wouldn`t give you much speed but could work when sliding up to the higher note.
Good luck and feel free to experiment with which fingers give you the most fluency.
Hi Dan, thanks. At the beginning, it seemed to be impossible for me to use the pinkie. Hence, I asked. But now, after a couple of weeks, it’s no problem anymore.
Awesome, glad to hear it, Andreas! Goes to show, good proper practice, goes a long way. Well done!
Wow…As Leisha already explained this is a great ‘Trick’ for learning the other patterns just by adding the transitional notes. I’ve spent years struggling with this and you have just opened my eyes with this explanation. I have also tired this in Gm and Fm using the same approach and it sounds great….thanks again!