

One of the most boring things a guitarist can do when playing a strumming song is to strum the song in the exact same way using the exact same strum pattern throughout.
In this post, you’ll learn how simple it is to methodically adapt the strum pattern and how it will give your strumming songs a massive new lease of life.
Don’t get me wrong, when you are learning your first 10 songs it’s okay to keep the strumming pattern simple and straightforward, but as soon as you are comfortable playing the song, try varying the strum pattern at least a little.
The Main Ways To Spice Up A Strumming Song!
There are three main ways to really spice up a strumming song.
- Vary the strum pattern
- Use strumming fills
- Adds riffs and embellishments
In this lesson, we are looking at number 1 – varying the strum pattern.
I have covered number 2 and 3 in my In Focus tutorials which are part of my membership programme.
What we will do in this lesson is talk about the different ways you can adapt a strumming pattern and we will use the ‘Ballad strum’ pattern as our example.
The Ballad Strum Pattern
We will vary this super basic strum pattern in a few simple ways to make it much more interesting.
If you don’t know it, the ‘Ballad strum’ pattern is a really simple strum pattern that unsurprisingly works really well for many ballad type songs.
I use it and teach it for songs such as Let it be and it sounds great!
The strum pattern is like this:
- D DU D DU
It is essentially D DU played twice.
Often the D DU is played on one chord and then there is a chord change to the next chord as there is in Let it be.
Have a listen to the examples below which use the chords of G Major and Cadd9 for which the chord charts are below.
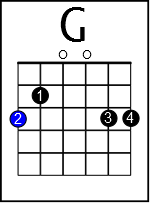
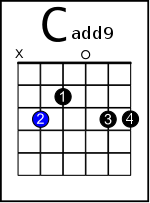
I chose those chords as they are pretty simple to play and change between for most of you. There is nothing worse than trying to practice something with the strumming hand only to struggle with the fretting hand!
A quick tip on up-strumming!
Don’t try to strum all the available strings in the chord on an upstrum.
Instead just tickle the treble (top 3 strings) as described in this video. The up strum should generally just keep the groove going.
Far too many guitarists are taught that they need to strum every string available to them in the chord.
For example, have you tried up-strumming the five strings available to you in a C Major chord? It is awkward to say the least and often sounds jerky or ‘harp-like’. Instead, watch the video and simplify your up-strumming. It works wonders for most beginners.
Anyway, let’s begin…
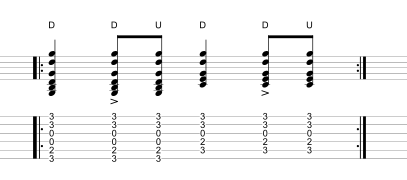
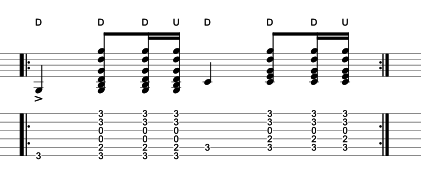
The ‘Ballad Strum’ Pattern
This is the ‘core’ strumming pattern that this lesson uses as its template. Remember though, apply the following ideas to any strum pattern you like!
The Ballad strum pattern uses a simple D DU D DU and in our examples, we have the chord change from G to Cadd9 halfway through (as is common with this strum pattern). Leave your ring and pinkie fingers on throughout! The double dots that encompass the bar means you repeat the bar.
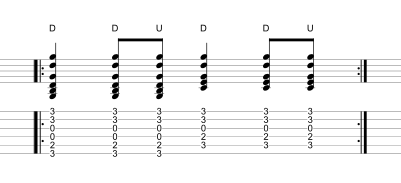
Variation 1 – Add an extra 8th note strum
Our first variation is very simple and is a good first step for varying any strum pattern. Whenever you get two downstrums together, as in this example, you can simplify the strum by adding an upstrum in the gap. It is an easy natural sounding variation.
Top tip! – Remember, don’t try to be too precise when up-strumming. If you catch just the treble (G, B, and high E) strings it will nearly always sound fine.
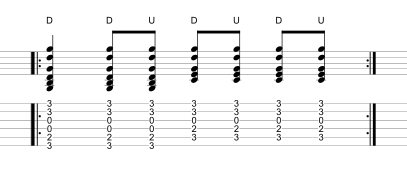
Variation 2 – Accent
The next easy variation is to strum the second and fourth downstrums a little harder which is called adding an ‘accent’. These two happen on the key beats of 2 and 4 which is where you would normally do this. (This is another good reason to tap your foot and count the beats when doing so).
You will see a symbol above the tab directly above which chords to accent. The symbol looks like this…
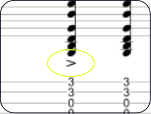
Top tip! Don’t try to strum the accented strum TOO loud. Make it noticeably louder than the other strums but don’t strum too hard. On the same note, don’t strum it so soft you can’t hear any difference between the normal strums and the accented strums.
Variation 3 – Start with the root note
A great variation for any strum pattern is to start with a bass note instead of the full chord. The bass note is nearly always the root note for the chord which for G is on the low E string and for C on the A string.
Top tip! Hit the single root notes harder than when you strum. This is because you want them to stand out and one string is naturally quieter than the six you hear when strumming. Therefore, you need to hit this one string a bit harder. Don’t be afraid to really pluck it quite hard and then adjust to your taste.
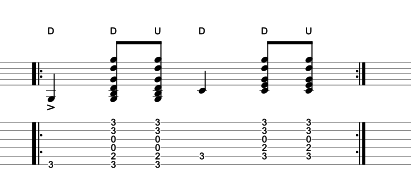
Variation 4 – Add a stop
Any strum pattern can be given extra groove by simply adding a stop in at certain points. This point is usually on beats 2, 3, or 4 but can be in different places. For this example, the stop is on beat 2 which nearly always sounds good.
Top Tip! Make sure you completely silence all the strings. You can do this by placing your strumming hand on the strings right about where you strum. Any strings ringing out during this ‘stop’ will really ruin the flow! If you stop the strings with a little force it can add a percussive sound to the pattern which is a bonus.
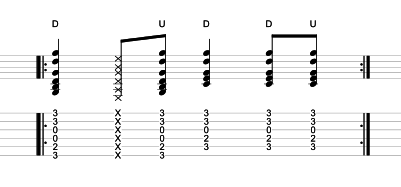
Variation 5 – Add a quick 16th note flick
I love this sort of variation. It is tricky but sounds great and really ramps up the end of the strum pattern in a cool and groovy way. What we are doing here is simply swapping the last upstrum for a faster down and then upstrum, but this down and upstrum is double the speed of the single upstrum that was there before.
Top Tip! Practice this one slow and I mean really slow. Take the whole strum pattern and slow it all down and then gradually speed it all up. Listen closely and emulate the rhythm!

Variation 6 – Root and the flick!
Our final variation is a combination of the above where we put together the root and the fast flick for a really big sound. Notice the extra flick earlier on in the pattern too just before beat 3. If you can do the flick at the end as in the earlier example, this extra flick should be easy enough as long as you go slowly.
Can you hear how different this sounds from the original? For some songs, it might be too different from the original but at the very least it shows just what you can do to spice up a simple strumming pattern.
Top Tip! Once again, practice this slowly as it requires a few different techniques and a bit of thought to process it all!
If you ever find your chord strumming a little boring you can take the above ideas and apply them to the different strum patterns you know. If you don’t really know any set strum patterns then you need to learn at least a few.
In my course, Strumming With Soul, I go through the most important strumming patterns and one of the bonuses of that course is called ‘How to vary the two most common strum patterns ever’. This takes you through the above ideas but, for, you guessed it, the two most common strum patterns ever.
Just a quick note, you CAN use the same strum pattern throughout a song but if you vary it a little here and there (it is not necessary to vary every bar) you will find they get a brand new lease of life, your rhythm skills will improve, and your audience (even if that is just your loved one in the next room) will enjoy hearing your playing much more!
Go on, get varying the strum patterns you know and love and leave a comment below letting me know what you think and how this lesson helped you.
Again, some good ideas here. Gonna practice these down the beach tonite ?
Good stuff, Stig! On the beach is a great place to practice! Enjoy!
It was nice and could understand well.perfectly executed
No problem at all, glad you found it useful!
[…] it comes to learning strumming patterns, one of the ways I get students to learn them faster is […]
[…] easy way to practise guitar dynamics is to strum just one chord with a strumming pattern you are comfortable […]
[…] a pro. Once you get good at learning the above examples it is key that you learn how to adapt your guitar strumming patterns which will allow you to blossom and develop as a rhythm […]