Johnny Marr at the AIM awards 2019 by Jwslubbock, licensed under (CC BY-SA 4.0)
Welcome, Guitar Ninja, to part 2 of our series of Killer 3 string chords. So far, we have discovered how to play a bunch of Killer 3 string guitar chord triads – 4 different chords all based around G.
The four chords are G Major, G minor, G sus2 and G sus4. In this lesson we are going to step it up and add some interesting rhythm to the chords and change between the chords within in a bar as apposed to at the end of a bar.
This will add a sense of melody along with the chord and to the untrained listener will sound like two guitars going for it at the same time. Cool, don’t you think?
First, let’s add our bit of rhythm.
The following 3 exercises use the same four chords but instead of a straight eighth note strumming pattern we are going to add a little bit of groove. The strum pattern in the example shown below is what I call The Ultimate Strum Pattern. It is shown below using “D” and “U”.
The D = Downstrums and the U = Upstrums.
The pattern is played D, D, U, U, D, U. Click here for more help with the strum pattern if you need it. Go to the bottom of this lesson to download your free Guitar Pro file to hear the examples in action.
Little ditty #4 (chords played with a groovy strumming pattern)
Be careful with the strum pattern and take your time getting used to playing the two upstrokes one after the other. Notice how the changes between the chords still take place at the end of a bar for this example. We are still keeping it fairly simple here.
Little ditty #5 (Minor – faster changes to add melody notes)
Now, example 5 starts to get a bit more interesting. We are now changing between Gm, Gsus4, and Gsus2 all within the same bar.
Little ditty #6 (Major – faster changes to add melody notes)
Example 6 is the Major version of example 5.
Adding Chord Progressions
All the examples so far have been based around a G chord and it’s variations (Major, minor, Sus 2 and Sus 4).
Now let’s move away from the chord of G and use these chord variations on different chords such as Em, D and C.
The great thing about these 3 finger chords is that they contain zero open strings and therefore can be moved up and down the fretboard to make other chords but without us changing out shapes.
For example, if we take the Gsus2 chord and move it up two frets, we now have an Asus2.
It’s all about knowing which note in the chord is the root note and knowing where the different notes are on the fretboard.
Let’s try a I-V-VI-IV chord progression using our chords. In the key of G Major a I-V-VI-IV progressions is the chords of G, D, Em, C.
Below is our chord diagram for the G Major shape.
Remember, the root note for our shape is on string 3. Therefore, the fret we place the note on the 3rd string is the one we assign to the root note of the chord. Eg, the 12th fret, 3rd string is a G note, and we are playing a Major shape, therefore we get a G Major chord.
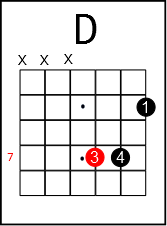
To move this chord so it becomes a D Major chord, we need to know where the D note is one the 3rd string and move this chord to there. This would be at the 7th fret as shown below.
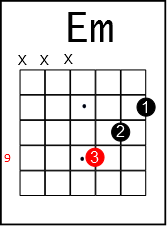
The next chord is an E minor chord, so let’s play the minor shape and move it so the note on our 3rd string lands on an E note which is at the 9th fret.
For our final chord, we are playing a C Major chord, so we need to go back to the Major shape and find the c note on the 3rd string to find our C Major chord. This is at the 5th fret.
In the next lesson, we will discuss finding the root notes using these shapes with a super handy diagram, so you can play any chord of your choosing at any time. For now though, let’s use our G, D, Em, C chord progression in a practical example.
Little ditty #7 ( I-V-VI-IV)
We have kept the strumming pattern used in the above examples for simplicities sake and for now have stuck with using just Major or minor versions of the chords.
Little ditty #8 ( I-V-VI-IV with sus2 and sus4 variations added)
This time we play a I-V-VI-IV chord progression in the key of G Major again, (G, D, Em, C) but instead of 1 bar of each, we now have 2 bars of each and we have added in the Sus2 and Sus4 chords to create a melody within the chord progression. This really spices things up and starts to really show some of the potential of Killer 3 String Chords.
Listen to the examples….
Download the Guitar Pro files to hear the above 3 examples in action.
Right click HERE and hit ‘save as’, then extract the Guitar Pro files to play them back. You will need either Guitar Pro or the free Tux Guitar installed on your computer to listen back to the examples. Download Tux Guitar here.
Check out part 3 HERE to learn two more shapes, how to use them together, how to find the root notes for all the chord shapes, and generally be a more bad ass guitarist.


[…] you missed Part 1, Part 2, part 3, check those out first as you are best to follow this series in […]
[…] Check out Part 2 by clicking HERE. […]
[…] you missed Part 1 and Part 2, check them out as you are best to follow this series in […]
Another great lesson. Many thanks.
Very useful, easy to follow and after a Google search the best site to learn triads. Thanks
Brill, thanks, Chris. 🙂
Undoubtedly the best lesson I’ve learnt about TRIADS, this is profound,be blessed