
Ben Harper Live @ Ippodromo delle Capannelle by Fabrizio Sciami, licensed under (CC BY-SA 2.0)
Do you know about the art of ‘Pivoting’?
If not, in this post we will learn about it, how to apply it, and most importantly, how to save you weeks and possibly even months of frustration applying it to your chord changes.
The fastest way to get your fingers to move from one chord to another is to use what I call the ‘Pivot’ method.
Pivoting
Using the ‘Pivot’ method:
- you will keep one finger in the exact same spot for two (or more chords)
- then the other fingers will pivot around that one finger into the correct spot taking the shape for the next chord. (More on exactly how to perform it in a second).
The ‘Pivot’ method also allows you to build up the all important muscle memory required to change chords effectively.
Obviously not all chord changes can be pivoted between, but there are certain super common chord changes that we can indeed ‘pivot’
Remember, by ‘pivot’ I simply mean, leave at least one finger on the fretboard in the exact same place for both chords.
I have highlighted the finger which should be your ‘pivot’ finger in red in the following 5 examples.
This finger should NOT move off the string and fret that it is located on for both chords.
Faster Chord Changes!
Take a look at the 5 examples throughout this post and apply whenever you make this chord change. The following 5 chord changes will never be the same once you use and apply this method.
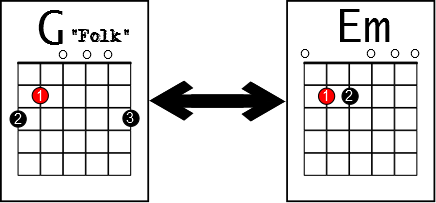
1) G – Em
G to Em is a chord change you have no doubt played multiple times. Most beginners learn these two chords within the first few weeks of playing guitar but often struggle to change between them for quite some time.
They are popular because they aren’t overly difficult to play (especially not the E minor anyway!) and because they are used alongside each other in many songs.
Songs such as Oasis ‘Songbird’ and Ben E. King’s ‘Stand By Me’ (when used with a capo on fret 2) use this particular chord progression.
Have you heard of the ’50’s chord progression’?
It used 4 chords, and those chords in the key of G are, G, Em, C, D.
Shown in the diagram below is the 3 finger ‘folk’ version of G, but it doesn’t matter if you use the 3 finger ‘folk’ or 4 finger ‘rock’ versions as the principle point is the leaving of the index finger on the A string on fret 2 for both chords.
This is a great chord change of which to get used to using the idea of pivoting.
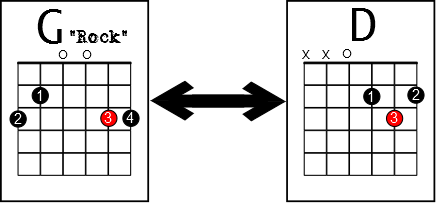
2) G – D
Is this the most popular chord change on the guitar? I reckon it is definitely very high up on the list.
So many songs (especially modern ones) have a G to D chord change.
This is mainly because the key of G is a key that is very suited to the guitar, the change to D sounds so powerful and because it is part of the infamous I-V-vi-IV chord progression in the key of G.
The G is the I chord and the D is the V chord.
Here we are using the ‘rock’ version of G which differs from the ‘folk’ version by having our ring finger on the 3rd fret of the B string and pinky on the 3rd fret of the high E string.
This stationary ring finger allows for a more upfront sound and most importantly here, allows us to keep it in the exact same spot for the chord change saving you many hours of frustration moving between these two chords.
Once you have spent a short while getting used to changing between these two chords in this way, you will be able to play the songs you love without that annoying little pause, and you will sound far more professional for it.
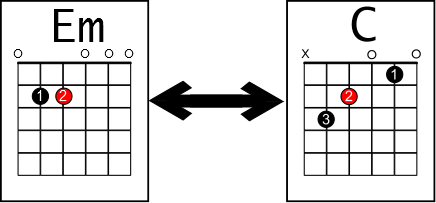
3) Em – C
So many guitarists learn to play Em in a way that actually turns an easy chord into a difficult one.
Many will play it with the middle finger on the 2nd fret of the A string and the ring finger on the 2nd fret of the D string.
Why, oh why?
A lot of guitarists learn it like that because it looks just like an E Major with the index finger lifted off.
Well, that would certainly make changing between E Major and E minor simpler, but how often will you make that change?
Most beginner guitarists are never shown how much simpler the following way is.
Em to C is definitely one of the most common changes about. It is part of the infamous I-V-vi-IV chord progression in the key of G.
The Em is the vi chord and the C is the IV chord.
The chords are G-D-Em-C and are used in countless songs so save yourself time and have a crack at changing between these two chords in this way to learn and enjoy more classic tunes.
If you have not discovered any songs that use this chord progression yet, it won’t be long!
Therefore, I recommend perfecting pivoting between #2 (G-D) on this list and #3 (Em- C) – then linking them together to practice the I-V-vi-IV chord progression.
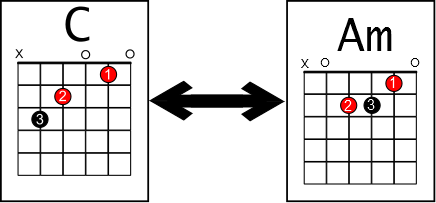
4) C – Am
C -Am is a great example of the art of pivoting as two out of the three fingers can remain in the exact same place for both chords.
Fingers 1 and 2 do not move. The 3rd finger simply ‘pivots’ around those two fingers making one of the easiest chord changes in the book.
Thankfully, C to Am is one of the most common chord changes in music.
This is another chord change that is part of the 50’s chord progression, but this time in the key of C.
In the key of C, the 50’s chord progression is:
C, Am, F, G – a very common chord progression for a lot of songs written in, (believe it or not!) the 50’s!
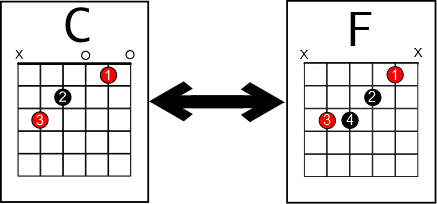
5) C – F
Many guitarists have a hard time learning and mastering the F chord.
Some tough it out and attempt to play the ‘big barre’ across all 6 strings, which for some is craziness!
Any barre chord is tough for most beginners (and even some intermediates), but the 6 string big barre F is even more so.
Not only do many acoustic guitarists have an action that is difficult to play making all barre chords tough, but the first fret is the toughest place to play a barre chord (in most cases) due to the tension from being so close to the nut.
Well, all that is why I don’t recommend the ‘big barre’ for the F chord but rather the little version below.
The great thing about this version is that it makes the change to and from C much, much simpler – and guess what, a huge amount of songs has that chord change in it!
These songs include Steve Harley and The Cockney Rebel ‘Make Me Smile’ (no capo) and Ed Sheeran’s ‘Give Me Love‘ (capo 1).
If you previously played any of these chord changes lifting all your fingers off and placing them down again, stop, and give yourself a little smack on the tush (kidding).
You now know you can save lots of time, energy and frustration leaving certain fingers on the fretboard at all times, mastering the art of pivoting.
The reason why this is such a good method is that it makes it much easier to get all the fingers in the correct position quickly and without fuss – making the change between the two chords fast and seamless.
This will allow you play a song without the dreaded pause which as I’m sure you have found kills momentum and creates masses of frustration for most beginners.
For more help with changing chords quicker, you may like to check out my free beginner guitarists 21-Minute Kickstarter course.
Be sure to apply the Pivot method to these 5 chord changes to save you time and frustration so you can enjoy playing the guitar more than you ever have. There are plenty more chords you can ‘Pivot’ between so keep this method in mind whenever you learn a new chord or find that the change between certain chords is slow.
Go forth and conquer the ‘pivot’ method and have fun writing and learning lots of songs.

AWESOME
Cheers, Dix!
[…] Master the G, D, Em, C (back to G) Chord changes. Cycle through these chord changes until they are perfect and fast. Time how many cycles you can do cleanly in one minute. Aim to beat […]
Thank you so much for this. It makes it much easier for me as a beginner
How about sliding fingers like the A to D transition.. . ? keeping the 1 finger in place sliding the 3 up a fret and moving the 2…..
[…] don’t even have to do it at the beginning of each bar, you can do it whenever there is a chord change just to outline the […]
Just corrected a big error on my chord changes.
Thanks
[…] Check out this guide to find more examples of the ‘Pivot’ method and to improve your chord changes. […]