
Johnny Marr at the AIM awards 2019 by Jwslubbock, licensed under (CC BY-SA 4.0)
Welcome, dear Guitar Ninja, to Part 3 of our series of Killer 3 string chords. So far we have learned 4 variations of a killer 3 string chord, learned how to apply rhythm to them, created melodies while playing a chord to create the illusion of two guitars, applied the techniques to a super popular chord progression and learned 8 little ditties using the techniques.
Phew…If you missed Part 1 and Part 2, check them out as you are best to follow this series in order.
Now, it’s time to expand our repertoire and play the different chord types but now with 2 more shapes. This will allow us to truly free up the fretboard and save us from having to make big jumps up and down to play certain chords.
Efficiency as well as killer sounding chords is the name of the game.
Nerd alert!!!
Before we get going on this lesson, now is the time to get nerdy and explain the theory behind what we are doing. Learning the theory makes everything come together in a useful and practical way for y’all.
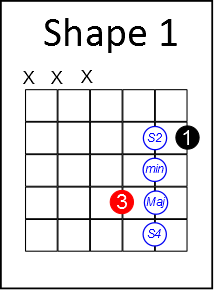
A killer 3 string chord or a triad is a chord that is formed from 3 different notes. That is the root note (shown in red on the diagrams) the 5th note (shown in black) and the 3rd note (shown in blue).
The 3rd note is the one we are moving up and down a fret to change the name of the chord (Major, minor, sus2, or sus4).
Notice, you move this note up 1 fret to turn a minor triad into a Major triad and vice versa.
If you move the note that makes the chord a Major triad up one more fret, you now have a sus4 chord. This is where the sus4 gets its name. A ‘sus’ chord is a chord where the 3rd note is replaced by either the 2nd or 4th note from the scale.
Let’s take the G Major scale. G, A, B, C, D, E, F#.
A G Major chord is formed from the 1st or the root which is G, the 3rd which is B, and the 5th which is D.
During our chord variations as shown in the diagrams, the 1st and 5th which are G and D do not move. It is the B note that we change to change the name of the chord.
- A G minor chord is formed from flattening (lowering) the 3rd note of B by one fret so it now becomes Bb.
- A Gsus2 is formed by replacing the 3rd note of B with the 2nd note from the scale which is A.
- A Gsus4 is formed by replacing the 3rd note of B with the 4th note which is C.
Notice that when the note on the 2nd string is played at the lowest fret marked on the diagram, the chord becomes a sus2, a fret higher it becomes minor, a further fret higher it becomes Major, and a further fret higher it becomes sus4.
Make sure you are clear on this as it’s a really important concept to be able to grasp.
If you recall, our first shape looks like the following. You may not have seen a chord chart laid out like this before. What I have done for clarity is shown all 4 chord shapes laid out on one chord chart. If you are unsure or want to see the individual diagrams take a quick look over part 1 of this series.
As you can see, the root note on the 3rd string doesn’t move, neither does the note on the 1st string.
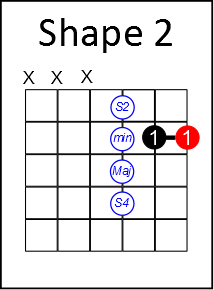
If you are happy with shape 1, we will apply the exact same principle and learn our 2nd shape. This is all based on the shape of a regular open A chord.
Our 2nd shape looks like this….
As you can see in shape 2, just like shape 1, two of the notes don’t move. The root note (red) and the 5th note (black) are static, and the notes on the other string (string 3 this time) move up and down a fret to define whether our chord is Major, minor, Sus2 or Sus4. Just by moving that blue note we have 4 different chords. This is all based on the shape of a regular open E chord.
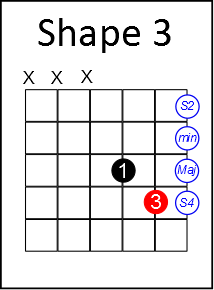
Get comfortable with shape 2 before moving on to shape 3….
With shape 3, the same concepts apply. The notes that don’t move are the root note and the note on the 3rd string. In this instance it’s the note on string 1 that makes all the difference in terms of defining whether or not the chord is Major, minor, Sus2 or Sus4. This is all based on the shape of a regular open D chord.
Once you are happy with all 3 shapes and the all 4 chord types (Major, minor, Sus2 or Sus4) for each shape, the next step is to be 100% comfortable with the root notes and finding your desired chord all over the fretboard.
The root note is the note that tells us what chord we are playing. There is a really useful formula we can use to help us.
The formula is:
The root note of the relevant shape + the chord type = the actual chord
Eg, if you play a Major chord shape with a G root note, you are playing a G Major chord.
To know what chords you are playing you will obviously need to know where all the notes are on strings, 1, 2, and3.
If you don’t already know them, look at our Root Note Finder below, learn them one string at a time, and then apply that knowledge to finding the actual names for where you want to play the chords.
Question Time…
Q1. If I were to play a minor chord using shape 1 with the root note on the 10th fret, what chord would I be playing?
Q2. If I were to play a Major chord using shape 2 with the root note on the 7th fret, what chord would I be playing?
Q3. If I were to play a Sus 2 chord using shape 3 with the root note on the 7th fret, what chord would I be playing?
Q4. If I were to play a Sus 4 chord using shape 2 with the root note on the 12th fret, what chord would I be playing?
Answers at the bottom.
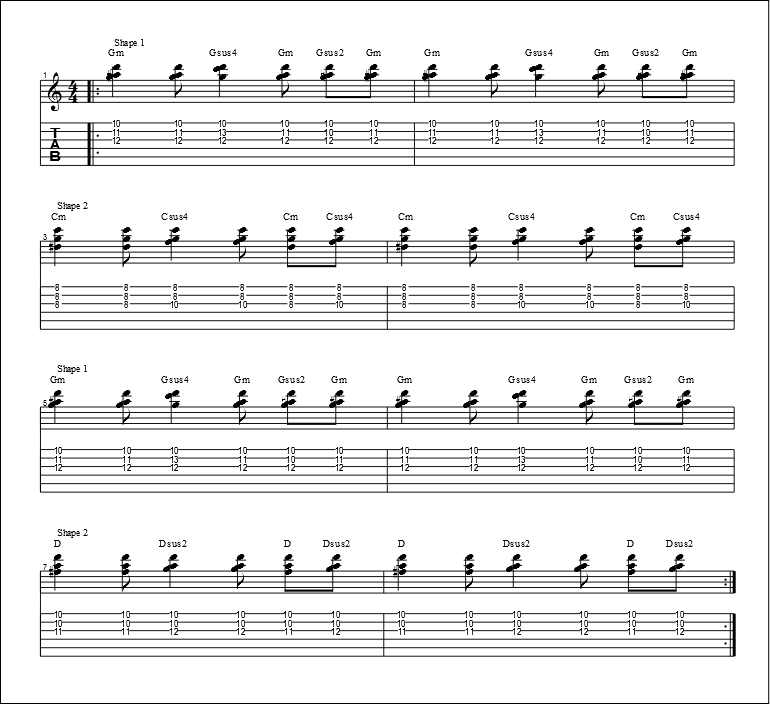
Little ditty 9 (Uses shape 1 and 2)
In example 9 we are starting to use two shapes instead of one to play our chords. Using multiple shapes is far more efficient as we don’t have to make big leaps up and down the fretboard.
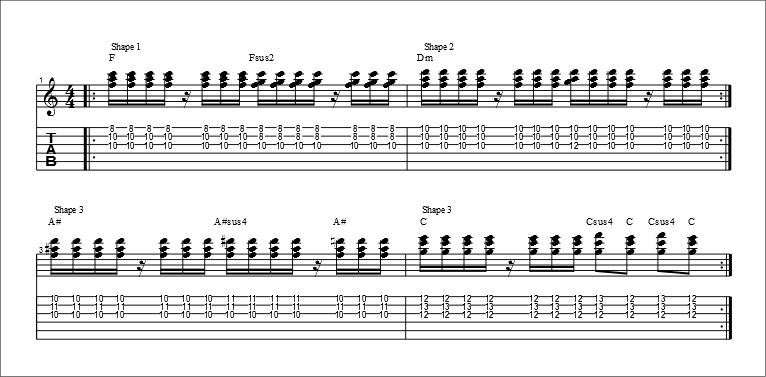
Little ditty 10 (Uses shape 1, 2, and 3)
Example 10 is where things get really spicy. We are now using all 3 shapes to create cool sounding progression that has a coool bit of rhythm as well as uses the Major, minor, sus2 and sus 4 shapes. Take your time and get the basic chords of F, Dm, A# and C sorted, then get the rhythm correct and then finally add in the Sus chord variations.
Ok, we a have really stepped it up in part 3 of our series of Killer 3 string chords. There’s been some pretty big concepts bought up, so take your time with this lesson, and don’t forget you can leave a comment below with any queries or comments about this series of lessons.
Listen to the examples….
Download the Guitar Pro files to hear the above 2 examples in action.
Right click HERE and hit ‘save as’, then extract the Guitar Pro files to play them back. You will need either Guitar Pro or the free Tux Guitar installed on your computer to listen back to the examples. Download Tux Guitar here.
Stay tuned for part 4 where we will wrap everything up in a nice shiny little bow with some examples of how to use these ideas like your heroes, one little secret but massive benefit of 3 string chords and more…
Question Time Answers…
Q1. If I were to play a minor chord using shape 1 with the root note on the 10th fret, what chord would I be playing?
F minor
Q2. If I were to play a Major chord using shape 2 with the root note on the 7th fret, what chord would I be playing?
B Major
Q3. If I were to play a Sus 2 chord using shape 3 with the root note on the 7th fret, what chord would I be playing?
F#sus2
Q4. If I were to play a Sus 4 chord using shape 2 with the root note on the 12th fret, what chord would I be playing?
Esus4


[…] out part 3 HERE to learn two more shapes, how to use them together, how to find the root notes for all the chord […]
Hi thank you so much for your Killer 3 string chords lessons . As I am starting to play electric guitar , and need to learn to play on the high strings chords , this has been so helpful for me 🙂
That`s great to hear, buddy. The killer 3 string chords are loads of fun especially for jamming with! Keep up the good work!
Thanks Dan, these patterns are really handy. I’ve been working on using the basic minor and major chords with inversions when accompanying a baroque and renaissance recorder group. The treble chords cut through the texture very nicely when I play such treble chords. Your patterns give an excellent supplement – sus 4 to major third is used a lot in this music. Next time I’ll pump out treble chords in Pachelbel’s Canon: I V VI III IV I IV V – over and over with variations.
I can see I’ve got some study ahead.
Hi Gerry, that`s great that you are using the above ideas in a very practical setting.
You are absolutely right, these really cut through in a band setting and that is one of the coolest things about using them (as well as being very melodic sounding). I`d love to hear how you apply them to Pachelbel`s Canon. Send me a recording if you ever do one! Many thanks.
FANTASTIC, EASY SHAPES, I UNDERSTAND THE THEORY AND CANT WAIT TO MOVE THRU ALL OF THEM. THANK YOU SO MUCH
It`s my pleasure, Clayton. Many thanks for the comment and I hope you are enjoying using these shapes!
Wow thank you! The whole series is super helpful for connecting to the fretboard, and I was able to understand the theory! The examples were helpful to get it into my fingers.
Thanks, Zach, it was a really fun series to do. Delighted that you enjoyed it and found it useful! Dan
Gracias Dan, estoy deseando trabajar esto
This is a great lesson and I think learning to play movable chords in general is a great way to learn the fretboard, of course along with intervals. I especially think that movable chord shapes on the first 3 strings is the best place to start learning movable chords. An immense thank you for putting together this lesson. One favor, please:
can you put this into a PDF file we can download?
Thanks, Steven. I’m delighted that you found it useful. You are right, the top three strings are the most stand-out, are very melodic and work great for this. A PDF of some sort is on the list for one of my team to do, hopefully soon. It may be that it all gets put together for a fun and short mini book too. Thanks for getting in touch!
Hi Dan,
Thanks for this guide, the theory was mega useful but has left me slightly confused.
I was under the impression that the root note in music is the first (and lowest) note in a chord, but in your shape 2&3, the root note is highlighted in red and isn’t the lowest/first – have I miss-understood the theory?
I think it is utilising first and second inversions of the triad.
For any Triad
In Root position = Root, Third, Fifth (Where root is the lowest note, Fifth is the highest note).
1st Inversion = Third, Fifth, Root (Third is the lowest note, root is the highest note)
2nd Inversion = Fifth, Root, Third (Fifth is the lowest note, Third is the highest note).
I’m no expert so this may be incorrect 🙂
[…] you missed Part 1, Part 2, part 3, check those out first as you are best to follow this series in […]
[…] out part 3 HERE to learn two more shapes, how to use them together, how to find the root notes for all the chord […]
[…] string chord triad is a type of chord that is played on a string instrument, such as a guitar or ukulele. The chord is […]
I believe there is something wrong with your shape 2 diagram. You have two “1”s (missing a 3 like the other shapes)
Just to be clear, the ‘1’s refer to the suggested fingers you can use.
Thank you so much for this 3-note lesson on the 1,2, & 3 strings. I am learning to play baritone ukulele; my guitar teacher has been using 3-note chords for my lessons. This helps so much.