
The other day I talked about my complete disdain for most technical exercises out there in the land of guitar.
Today, I want to give you a tip on how to play the most commonly taught one ever, but specifically…
How NOT to do it and how you should practise it instead.
With all technical exercises for guitar, here is something I teach all students:
Always start your technical exercises off by doing what I call the “Anti-tension” version of it.
This is where your fretting hand fingers touch the strings, but they do NOT press down on them.
No pressing, only light touching of the strings.
The fingers simply touch the string with the lightest touch possible so the note sounds dead if you were to pluck it.
Let’s take the classic “Spider” exercise, which is probably the most commonly (and badly) taught exercise ever.
This is where each finger plays one fret like in the image below:
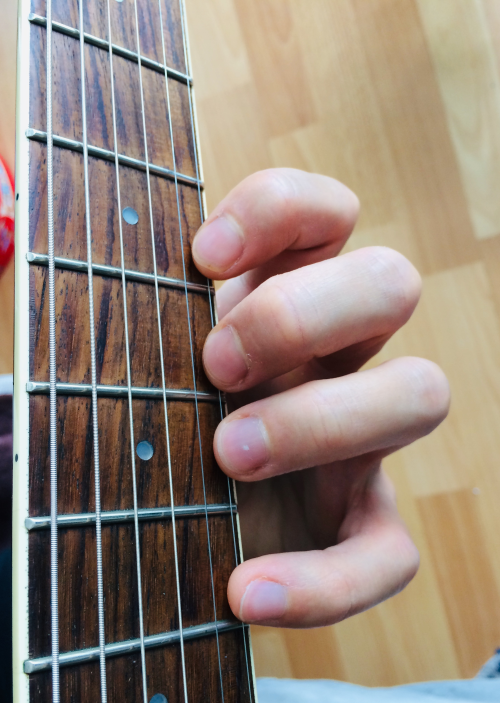
Click HERE if you can’t see the image.
One of the reasons why this exercise is taught badly is because students are encouraged to just stick their fingers on the fretboard and stretch and push, and battle like Napoleon at Waterloo just to get their fingers in position.
What you should do is try the exercise with no pressure on the string…
So that if the string were to be plucked, the note would sound dead.
It is actually quite tricky to do this and can feel a little strange, especially if you are used to squeezing the life out of the guitar.
It has a lot of benefits.
The reason – it will help you find the position your fingers need to be in quicker, it will help you train yourself to use less pressure, and it will reduce tension throughout your body.
This is the opposite of how most people are taught, and those are the ones who struggle with pain and frustration.
Don’t be one of these people.
Whatever exercise you do, try it.
No pressure.
Only super light touching of the strings.
When it feels good, add in a little pressure so the note sounds clear.
Then back off the pressure if need be and rinse and repeat.
I teach this concept in much more detail in my barre chords course, where there are three stages of adding pressure in a systematic and clear way.
These are the Anti-Tension, Adding Pressure, and Full Pressure stages.
Each one is key to not just being able to practise barre chords with the minimum risk of injury, but also for when practising any exercise.
Most people are taught to jump right to #3, which is a mistake.
If you want to learn more about the course, check it out below…
The Ultimate Guide to Barre Chords
Have a nice day and keep having fun with your playing.
Dan Thorpe
Guitar Domination
P.S. This post was originally taken from Dan Thorpe’s private email list. To get blog posts like this sent to you which are full of great tips to make fingerpicking, strumming, and learning guitar more enjoyable (especially if you are over 40) join Dan’s list. It’s 100% free, HERE.
Add Comment