As promised after the recent survey, I’ll be more creating a few more blog posts and videos on the blues—particularly acoustic fingerstyle blues. To get started with the blues you really need to be 100% comfortable with the structure, otherwise it will all fall apart quicker than you can say “my baby gone left me”.
In today’s blog post, I’ll teach you how to get comfortable with the basics of blues as well as learn a super cool blues riff.
The 12 bar blues uses a set structure that lasts for—you guessed it—12 bars.
There are 3 chords played within this 12 bar pattern and they are played at particular times.
It is so important to understand the sequence of these chords as nearly all blues-based music out there will use this structure.
As I have stated before learning and understanding chord progressions will save you lots of time in the future. The 12 bar blues is a perfect example of this.
Once you know the structure and what key you are in, you will be able to play the song or piece of music with other musicians (or backing tracks) with complete confidence.
You will also be able to jam along with complete confidence knowing exactly what chord is coming next. This makes the blues a wonderful tool for creating awesome jams.
Remember the scene in “Back to the Future” where Marty is on stage at the “Enchantment Under the sea”?
He turns to the Starlight Band and says:
“This is a blues riff in B”
…and the band knows exactly what to play while Marty rocks the lead to Johnny B. Goode.
Before playing guitar I always wondered how the band knew what to play—thinking to myself “that is not realistic”.
How would they know how to play and fit their parts with Marty’s together without knowing what he was going to play?
Even though the song is in Bb not B (a technical error from the filmmakers, but I digress), the fact is the band WOULD be able to know what to play to jam with Marty as they know the 12 bar blues and as Marty points out, Johnny B. Goode is just a 12 bar blues.
Yes, the lead guitar (what Marty plays) may be different for every song but the underlying track – the rhythm follows this consistent structure.
That is just one example of why learning the simple structure of the 12 bar blues is so important.
Now, let’s learn the structure and most importantly, how to play it.
To begin with, we will learn a typical 12 bar blues shuffle.
This little piece is one that everybody will recognise and everybody should learn. It is lots of fun.
The 12 bar blues shuffle
Take a listen to the following audio track. This is what you are going to learn and understand today.
The above is something very similar to what you would hear in Johnny B. Goode. Here it is again slower.
To play this piece, firstly, put a capo on fret 5 as there are a few stretches and we want to make these as easy as possible for now and capos are great for this.
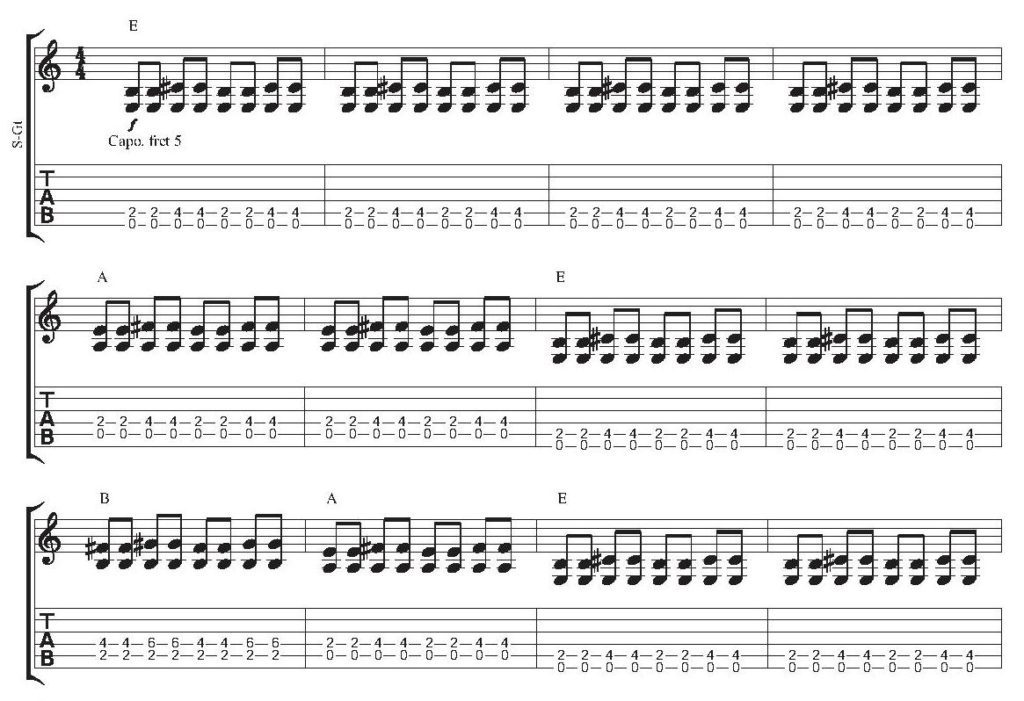
Take a look at the tab below, learn it over a few days and get comfortable playing along with the slow version above before before attempting the faster version.
Above all, take it steady, make each note clear and enjoy!
First four Bars (1-4)
We are starting off with an E power chord.
To play these four bars:
- Place your index finger on the 2nd fret of the A string and leave the low E string open
- Strum the A and low E strings twice
- Then add your ring finger onto the 4th fret of the A string
- Strum the A and low E strings twice more
- You then repeat all of the above to complete one bar
The first four bars are pretty simple as they are all played on just this one E chord. The tricky part can be getting the shuffle rhythm correct. The shuffle in simple terms is the bouncy feel you can hear in the track – this feel is very common in blues.
Be careful to only strum the low E and A strings here otherwise it sounds messy.
You can use all down strokes to play this if that is easier and at first you may want to play this with a pick if your strumming technique is not solid. Remember, we are using a capo at fret 5.
Next four bars (5-8)
Now we move to an A power chord.
To play these four bars:
- Move your index finger on the 2nd fret of the D string and leave the A string open
- Strum the A and D strings twice
- Then add your ring finger onto the 4th fret of the D string
- Strum the A and D strings twice more
- You then repeat all of the above to complete one bar
Notice how this is the same as what we played in the first four bars but everything has just moved up a string and also notice now we only strum the A and D strings and NOT the low E string as before.
We only stay on this A chord for two bars before moving back to the E chord for the next two bars.
Last four bars (9-12)
Now, for bar 9 we introduce a new chord into the sequence. This chord is a B power chord and is the hardest to play as there are no open strings in this chord.
To play these four bars:
- Fret the 2nd fret of the A string with the index finger and fret the 4th fret of the D string with the ring finger
- Strum the A and D strings twice
- Then add your pinkie to play the 6th fret of the D string.
- Strum the A and D strings twice more
- You then repeat all of the above to complete one bar
This is a big stretch in this bar and is the main reason we are using a capo. (The capo allows us to play higher up the neck where the frets are closer together and therefore less of a stretch). If you struggle with this stretch which everyone does at first, you may want to do some stretching exercises (which I’ll be writing a post on soon).
Once we have played this B chord, we then go back to the A chord for bar 10 and finally finish with the E chord for the final two bars.
Now, let’s put it all together.
Phew, that is a little tough and can be hard to remember at first if you have never attempted this before.
Firstly, I’d say, get playing it through at few times and get it sounding nice and musical. It’s a key piece of music to learn as it is the basis for a lot of music. You’ll hear it in rock ‘n’ roll, blues rock, rockabilly as well as other genres.
The 12 bar blues has a signature sound and one you should learn to recognise when you hear it.
Once you do hear it, it is pretty easy to jam along with. All you need to do is find out what key the song is in (which you can work out by ear – and which we will cover in a later post) and then move the capo up or down and play the above.
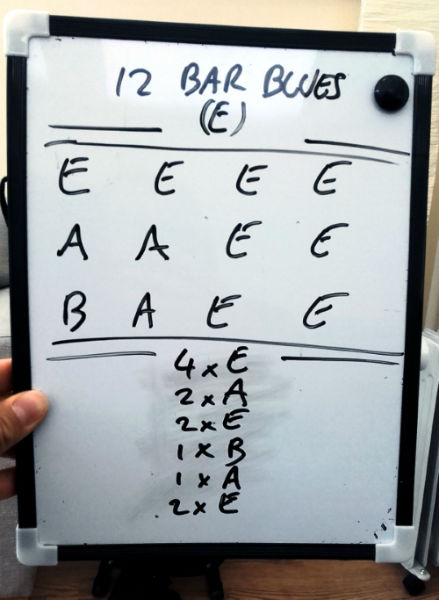
The 12 bar blues structure
Below is an outline of the piece we have just played as shown in chord form.
Pay close attention to the structure and remember to make sure you play each chord for the precise amount of bars before changing.
If you change too early or too late then you will be out of sync with the rest of the band or the backing track.
In the next few lessons in this series, I’ll take you through the exact structure for ALL 12 keys and exactly how you change keys, some variations of the pattern and how to really bring it to life!
I hope you enjoyed that one. This is a pure introduction to the 12 bar blues. It doesn’t matter if you have played for 10 weeks or 10 years it is well worth learning.
I didn’t want to get too technical with all the details in this lesson as for now I want you to just go ahead and get playing the blues.
Drop a comment with any questions and let me know if you enjoyed playing this piece.


If I could play like Marty, I’d be having a whole different kind of Blues right now… 🙂
It’s rather weird that for how simple it is, 12 Bar Blues can be so confusing at the beginning. Thx for taking time.
Yep, totally agree. 12 bar blues requires a little time invested at the beginning but once the structure has sunk in you will have a lot of fun with it forever , especially as you get better and better and can add more licks, riffs and different voicings to it!