

Barre chords are one of the most infuriating parts of learning guitar for most beginners. Unfortunately, many guitarists really struggle with them and usually, this isn’t their fault but it is the way that barre chords are taught. Most teachers and resources out there teaching barre chords are really poor.
We all know barre chords are really important to your long-term progression as a guitarist and even though a lot of songs can be played using a capo, there are 1000s of classics which need barre chords.
In this post, I’ll share with you some tips from my barre chords course that will hopefully make your journey of learning barre chords far more enjoyable and far less frustrating – all while promoting great technique which will stand you in good stead for your guitar playing.
1) Technique Always Comes Before Power with barre chords
The biggest problem with barre chords is that a student is usually told (or not corrected) when they think they need to press harder to make the barre chord sound clear and free from buzzing.
Usually, the guitarist uses bad technique and far too much force to try to play them. This causes pain in the fingers, wrist, and forearm and will tire the muscles out quickly at best and can possibly cause injury at worst.
If you keep doing something with bad technique and lots of pressure, it will eventually take its toll.
This can be a strain in the muscles or tendons which can put you out of action with your guitar playing for weeks or even months.
When you practice barre chords, be very, very careful about how you learn them as doing so, the wrong way can cause injury and possibly long-term arthritis.
Always, always remember to get your fingers set up and placed in the ideal position before adding pressure.
Pressure is the final thing we add and if we have good technique, we only need a small to a reasonable amount of pressure to make the barre chord sound good.
The amount of pressure needed depends on how good your technique is and how well the guitar you are playing has been set up.
2) Start With The A Minor Shape
When you include all the chord extensions and variations of each barre chord, there are a lot of shapes out there that you can practice but instead of starting on a random shape and hoping it will be useful to you, start with the A minor shape.
This is one of the most common barre chord shapes you will ever use, and it is one of the easiest to learn. Check out my intro video, bar chords on guitar for more on this shape.
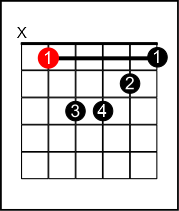
The reason why, is mainly because it is a 5-string barre chord shape – meaning, your ‘barre’ finger doesn’t have to barre across all 6 strings but instead only needs to barre across 5 strings leaving out the low E string.
If you don’t have long fingers (most of us do not) and/or the neck or your guitar is quite wide, then you will find this easier to practice and perfect than some of the tougher 6 string barre chord shapes.
The A minor barre chord shape is also a really good barre chord shape to ‘simplify’ (as you will see in the next tip), vary and turn into other lush sounding chords.
3) You Can Simplify Any Barre Chord Shape
So many guitarists are unaware that most barre chords can be ‘simplified’ in such a way they take the chord from being awkward and very difficult, to being something they can play and use really well with a little practice.
And what’s best is that these little ‘simplifications’ don’t actually affect the sound of the chord all that much!
Here is a simple ‘simplification’ of the A minor chord.
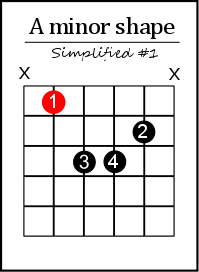
See what we have done there?
Instead of ‘barring’ across 5 strings with the index finger, it now just frets the A string and rests across all of the other strings.
In fact, although this is a barre chord shape, this is now no longer an actual barre chord. You are actually not ‘barring’ anything at all here.
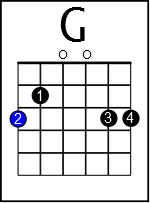
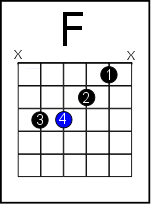
You can think of this shape as just a four-finger chord much like you do when playing a chord such as G Major or F Major when played like in the diagrams below.
You may think, “well, what if I am fingerpicking and need to hear the high E string?”
Good point. If that is the case, then you will need the ‘full’ version of the chord but you can build up to it.
If the full version is tough, start by perfecting the technique of the ‘simplified’ version and gradually start manoeuvring your index finger so it eventually creates a ‘barre’ across the strings.
Practising the shape in this progressive manner is easier and allows you to get your non-barre playing fingers into position without the awkwardness of the barre.
4) Practice Your Barre Chords On A Higher Fret!
For every barre chord shape, you learn, I highly recommend you practice them on the highest fret that is most comfortable for you. For most guitarists, this will be anywhere from fret 5-8.
The reason why is simple – the higher up the fretboard you go the closer the frets are together and therefore the less stretching you have to do.
As you don’t have to stretch as far higher up the fretboard (e.g. on fret 8 compared to fret 2) you can focus on getting your fingers in the correct position, make good technique a habit and get the chord sounding clear more often.
Once perfected at one fret, you can then move the barre shape down a single fret and get it sounding good there before moving down another fret.
You will know you have the chord sounding great when you can play the barre chord shape on the hardest fret of them all – fret 1!
Just remember, sometimes, going too far up the fretboard can make things harder, so find the fret that is most comfortable for you and practice your barre chords there.
5) Pluck, Don’t Strum When Checking The Barre Chord
I’m an easy-going guitar teacher but we all have a few things that can be mildly frustrating to see. One of them is when a student constantly checks the clarity of their chords by strumming every time.
When checking if the chord is clear, what you should always do is pluck each string in the chord and NOT strum them all. When strumming the chord, unless you have a great ear, you won’t be able to tell what the bad notes are.
If, however, you pluck each string instead, you will instantly be able to tell what string is ‘dead’ or buzzing and then you can go to work fixing it.
Once fixed, you can then strum away till your heart is content.
Just be aware though, many guitarists make the mistake of plucking each string in the chord, adjusting their fingers until the chord sounds good, and then strumming only to hear some buzzing come back – even though the chord sounded good when plucking.
This is usually due to them relaxing their fingers a little and making micro-adjustments to the chord once they hear it sounds good.
Remember this simple tip. Plucking each string highlights much more clearly what needs fixing in the chord and what sounds clear.
Get using these tips and start improving your barre chords today
There you go – five tips that will make your barre chords sound and feel better from today.
I don’t say this to discredit anyone but there are a lot of guitar teachers, (and some who are very popular on YouTube) who ‘teach’ barre chords but in a way that is actually harmful, and not helpful to students. Hopefully this lesson will help to fix this.
It goes without saying, you should be practising your barre chords on a guitar that is suitable for you (i.e. if you have small hands and fingers, then with a guitar with a narrower neck). If not, you will find barre chords tougher than you need to, no matter what. This goes for all your playing too though.
As I have stated before, a capo is a wonderful tool for learning and improving your guitar skills but long-term, make it your goal to get really good at barre chords. Your playing will be free from limitations if you do and many of those classic fingerpicking and strumming songs you want to learn will be there and ready for you to be able to play.
If you want more help on improving your barre chords, my course, (which is the biggest and most in-depth resource I have come across), will help you with your barre chords. It’s been out a few months and the feedback on it has been wonderful – it is one of my proudest achievements in teaching this wonderful instrument to date.
Try these 5 tips – even for just a few minutes a day and your barre chords will improve. Let me know your thoughts on this post by leaving a comment below and good luck with your barre chord playing!
Hi..It seems, no matter where I look…no one seems to address the problem, ( for me anyways) when I try to do a simple 2 string barre..ALL my fingers want to flatten out! Then when I raise them like they are supposed to be, my barre finger raises up!!! this drives me bonkers!!! The two string (1st and 2nd) for F chord as well as full barres…Any tips..Thanks in advance.. Sally
Same exact issues that I have. I believe this will have to be solved with practice sessions on the fret board of stretching exercises. Between those and practicing barres, eventually the fingers will limber up and strengthen up making the barres (and other shapes) easier. . . I hope.
—RWR
Hello, Sally, sorry for the late response. Since I’m practising barre chords myself at the moment, the best advice I can give you is this: since your index finger is essentially now working like a capo, you should reconfigure your finger placement. First place your 2-4 fingers correctly on the respective strings and then place your index finger to barre, you should roll it a bit (keep in mind you don’t need to barre all of the strings; essentially, if doing E shape barre chord, you only need to barre 1st, 2nd and 6th strings, because your other fingers are already pushing down on the others). And, start with lower up the neck, perhaps with A barre chord (5th fret). Once you nail this down, move up the neck gradually.
Thanks for explaining very clearly and in layman’s terms. Soon as I get home from work I’m practicing. Great article.
Thank you this helped a lot
Hi Everyone
I am a late learner – just turned 62!
I am having a real problem with my bar chords – I have fairly short fingers but discovered a problem at my lesson this week – the song we were learning required a change from F to Fm but there was no change in sound – the G strong was really muffled. My problem is my forefinger – as hard as i try, I just can’t get the G strong to sound clear.
I have tried lots of things – thumb placement, forefinger angle, but no cigar…
Any suggestions?
Many Thanks
Peter Smith
Melbourne Australia
excuse me but isn’t that simplified bar chord, “A minor” mentioned in the article, simply a “B minor”?
Technically, it’s a Bb on the diagram but by ‘A minor’ I was referring to the core shape the barre is based off – which is the A minor shape.