Guitar Triads are a really simple way to spice up your guitar playing. They are simply alternate versions of the chords you already know, but using them will allow you to add some jangly, sweet, and super melodic tones to your playing.
These alternate ways to play familiar chords will give you a lot more range and add diversity to your playing. Using them will help you sound head and shoulders above pretty much 99% of guitarists out there.
Yet triads are rarely used. I specialise in teaching adult guitarists who are learning later on in life.
Some of these students were brand new to the guitar, but many had played for 40+ years WITHOUT ever knowing about triads. That’s how rarely they’re taught!
…But fear not, during this series of lessons we are going to learn and demystify this part of guitar playing and look at 12 guitar triads (or “killer 3-string chords” as I like to call them.)
If you’re new to the guitar though or struggling, do check out my 27 tips on how to play the guitar.
Anyway, there are just 3 actual triad shapes for you to learn, with 4 different varieties for each…
Today we will look in depth at shape #1 and its 4 varieties.
…But first, what are triads all about?

Johnny Marr at the AIM awards 2019 by Jwslubbock, licensed under (CC BY-SA 4.0)
I’m glad you asked. Here’s some background:
- Top three strings – All the triads we are using (and most of the best triads) are played entirely on the first 3 strings of the guitar.
- Moveable! Each triad is completely moveable up and down the fretboard, giving you 12 possible chords for each shape (more on this later).
- Super useful – You will find all four shapes are extremely useable in the real world and act as a great gateway between open chords and barre chords. What’s not to like about that?
Here’s why I love triads…
They will help you stand out.
Every guitarist, man, and his dog is taught to play open chords down on the low frets.
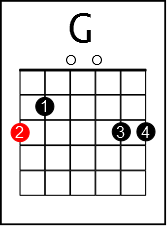
If I were to ask you to play a G chord on the guitar, where would you play it?
If you are like most guitarists out there, I’m guessing you would play it the following way…
(Btw, the root note for the chord is shown in red).
Now, if you wanted to play a G Major chord, but make it diverse and interesting (and higher in pitch), how would you do it?
Most guitarists wouldn’t have a clue which is a real shame.
Fear not though. In this series of lessons, you will discover how to leapfrog most of those guitar players… And even make them salivate with jealousy every time they watch you play.
Prepare to impress yourself and others…
Enter the World of ‘Guitar Triads’
The 4 chord types we will look at in this series of lessons are:
- Major
- Minor
- Sus 2
- Sus 4
Let’s get down to it and learn these super simple, super cool shapes that will help you on the road to becoming an intermediate player in no time.
The Guitar Triads Chart and Shapes
Below are the awesome shapes. Let’s have some fun learning them…
Major
The Major version of the shape is the most important as it’s the most used, so commit this shape to memory.
Notice that we are playing all the way up on the 12th fret, so this G will sound a fair bit higher in pitch than our typical G.
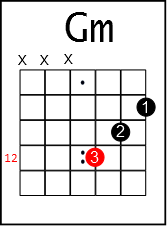
Minor
Can you see the only difference between the Major and minor shapes?
One fret is the answer.
To turn the shape from Major to minor, all we need to do is move the note on the 2nd string from the 12ft fret down to the 11th fret.
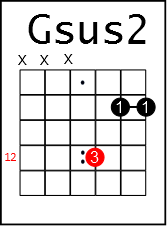
Sus 2
Move the note we just moved to turn the Major chord into a minor chord down a further fret and now we have a Sus2 chord. (Sus 2 chords are cool because they are NEITHER Major nor minor chords and therefore can be used instead of, or alongside each).
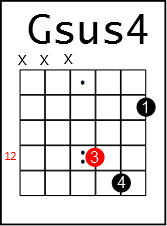
Sus 4
Now then, we’re playing this awkward but cool-sounding shape.
Watch out, you will need to use your pinky on the B string all the way up to the 13th fret to create a sus4 chord.
Again, sus4 chords are neither Major nor minor, making them very cool and very flexible.
Power Tip:
Barre your first finger across the first two strings as shown in the sus2 chord diagram and leave it there throughout for all four chords.
Doing so will make switching between the different chord types much easier.
To recap the shapes so far. The notes on the:
- G string (3rd string) which is our root note does NOT change
- High E string (1st string) also does NOT change
- B string (2nd string) is the one that changes
It’s well worth remembering the above!
Get used to switching between all 4 variations of this shape.
You may notice how much higher in pitch the chords sound.
That’s what we are after – diversity.
Now, you can not only play a low-sounding G Major chord, BUT you can also play higher-pitched versions of the chord too…
And with variations of Major, minor, sus2, and sus4.
That’s what those high frets and high strings are for!
Most guitarists just use the 12th fret and above for solos and that’s it.
What a waste.
To be able to nail this lesson and have some fun with these chords, get comfortable changing between the four shapes.
Remember, the key thing to be able to switch between them is to barre the 1st and 2nd string at the 10th fret.
A Little Tip About Using the 4 Triad Variations…
G Major – The following three versions all sound great when played alongside each other. (That’s because all the notes fit into the G Major key).
- G Major
- G sus2
- G sus4
…AND…
G minor – The following three versions all sound great when played alongside each other. (That’s because all the notes fit into the G Minor key).
- G minor
- G sus2
- G sus4
You can mix and match these triads and use them however you feel artistically inclined to do so.
Note, however, that G Major and G minor usually don’t fit together unless you are after a slightly unusual sound.
Let’s play through a couple of examples I’ve created of these chords in use.
Triad Ditty #1 (G Major Example)
Example 1 is a fairly straightforward way of playing through the Major, Sus 2, and Sus 4 chords.
You can strum it using all downs OR a down/up strumming pattern if you prefer.
Triad ditty #2 (G Minor Example)
Example 2 is exactly the same as example 1, except we have switched the Major chord for a minor chord.
Triad Ditty #3 (Combination Example)
Example 3 combines both the Major and minor versions to create something a little more unusual (but cool sounding in my opinion).
How Do I Use These Guitar Triads in the Real World?
I’m all about teaching you real-world, practical playing tips. The lessons you have learnt today are ones I have discovered from many of the best guitarists out there, but they’re also tried and tested with my students too, so you know they will work for you too.
Saying that, it’s important to implement the things you learn like this into your playing right away.
Here are some tips on using them before we move on to Part 2, where things get super exciting.
Using the Triads in the Real World
In the real world, you can use these 3-string triad shapes in some of the following ways:
- Strumming – Stop playing boring open chords and instead play your newfound triads and strum them (Johnny Marr from The Smiths does this to great effect)
- Picking – Take the triads and pick the notes to create a melody (add delay and you’ll sound a bit like The Edge and/or many shoegaze bands)
- Jamming – Play with a rhythm guitarist. Simply play the same chords but using the triad versions. It sounds great having one guitar play the lower-pitched open chords and another playing the higher-pitched triad version (this can create a kind of 12-string-like guitar effect)
- Lead – Incorporate these chords into your lead and solo playing at the right moments to create a more harmonically rich and more interesting guitar solo
- Chord Melody – Create melodic riffs from the triads (as done in the intro to “Brown Eyed Girl” by Van Morrison)
- Effects Pedals – If you play electric guitar, you can try playing these triads with a variety of effects for fun. Turn on a delay pedal, a tremolo, a flanger or wah for endless fun and turn your guitar into a synth! (All while keeping the music melodic and harmonically correct).
Listen to the Examples…
Download the Guitar Pro files to hear the above 3 examples in action.
Right-click HERE and hit “save as”, then extract the Guitar Pro files to play them back. You will need either Guitar Pro or the free Tux Guitar installed on your computer to listen back to the examples. Download Tux Guitar here.
Join us in Part 2 where we will be taking these simple examples and making some very cool tuneage out of them!
Your takeaway from this lesson is to mess about with either of the above combinations.
Get comfortable with switching between them. In Part 2 of this series, we will be going through some really cool little examples of how to make it sound goooooood.
See you on the other side.
Check out Part 2 by clicking HERE.


